March 30, 2008

Viking shield: part II


Hello,

I continued working on my shield. Unfortunately, I neglected to take pictures for every step, but I kind of replicated the necessary parts.

First up, here's the canvas I got:


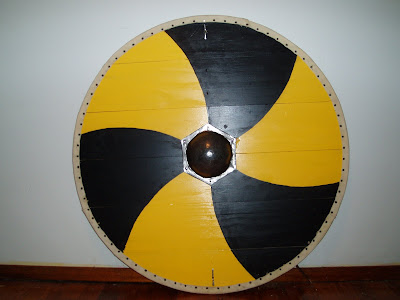
I cut out the canvas, and glued it onto the shield. I then painted it; pictures of that will come last, as that is the best part.

Then, I added the rawhide edging. Instead of nailing it on, I sewed it with hemp twine. Here's the rawhide pre-stitched:


And post:


As you can see, the twine on the right side is damp. This is because I stitched the first of three on most of the way yesterday, but had to soak the remaining part for the work I did today. Luckily, my water-based paints suffered none.

Until next time,


March 29, 2008

Valsgärde 6 helm: part II

Part 1 | Part 2 | Part 3

I finished the helm. It took a total of about 7 hours.

Here are the pictures:

All the pieces cut out and filed:


Everything together:


Second piece in:


Third and fourth:


Done:


Top view:


Suspension added:


And there it is, all nice and purty:


Here's my armourer's mark, the futhorc letters PK, my (real) initials:


That's it. It's going to be sent off in a couple days.

Peter Koby

Part 1 | Part 2 | Part 3

March 26, 2008

Valsgärde 6 helm: part I

Part 1 | Part 2 | Part 3

Hello,

The helm on which I am now starting work is an interpretation of the Valsgärde 6 helm. I'm making it for money this time, selling it to a Belegarth fighter in Puerto Rico.

Here are the pictures so far:


More later.

Peter Koby

Part 1 | Part 2 | Part 3

March 23, 2008

Tools


Happy Easter!

I promised I would post pictures of the tools I used to make my Viking helm, so here I go.

First off, here's my setup of forming tools. In the background, you can see my railroad rail anvil. On the left is my forming dish, made of a tin/lead alloy. Next is my round stake. And on the right is my head form.


Here's my metal shear. It is from Harbor freight, and cuts 16 ga. steel without any trouble.


This is the drill I used to make the holes that I couldn't reach with my punch (such as those on the dome).


Finally, here are the rest of the tools I used. (Click it for a bigger version.)


From left to right:
Whitney punch, #5: used to punch holes that I could reach
Rivet shaper: used to make the rivet domes round and smooth
Super fine point Sharpie
Big clamp
Small clamp
Earplugs
Hand clamp
Bigger clamp
Medium clamp
Pliers (3): the middle one is the one I used to hold rivets while I filed down the flanges (see more here); the top and bottom ones I used to hold the rivet while I filed the tip down
Half round file
Mill file
Ruler
Rubber mallet
Chisel: I used this to lever rivets out of places, open folded brass, etc.
Planishing hammer: I used this more to rivet the brass on that for anything else
End nippers: used to cut rivets
Ball peen/planishing hammer
Awl/center punch
Dishing hammer
Wrench: when things got twisted about, this was the easiest tool to twist it back (this and weighting the other end with my anvil).

I'm sure when I add the suspension, I'll use more tools, so more then.

March 22, 2008

Viking shield: part I


Hello all!

I made a Viking shield a while ago, but I decided it wasn't accurate enough. Also, since it was about 32" wide, it was rather difficult to walk through doorways with it. So I decided to take it to pieces, and upgrade it.

First off, here is the original:


I had to remove all the clinched nails on the rawhide, and the few holding the handle on. It was difficult, but I did it. Here are the pieces after disassembly:


I trimmed the shield by 1.5" in radius, so decreasing the width by 3". Then I took a plane (the old-school kind) to the edges, to thin them down, making them more accurate, and also lighter. Here they are:


I ordered canvas ($2.49/yd.!), which I will use instead of leather on the face of the shield. It's considerably cheaper, and possibly authentic. I'll continue working on it when the canvas comes.

Until then,


March 17, 2008

Viking helm: part IX

Part 1 | Part 2 | Part 3 | Part 4 | Part 5 | Part 6 | Part 7 | Part 8 | Part 9 | Part 10

Happy St. Patrick's Day!

I finished the aventail. I cut out all the slits, totaling 69. Here's the brass with all the slits:


Here's a closeup of the slits, showing how big the things actually are:


The way I riveted the thing on was to drill a hole exactly the size of a piece of brass rod, then cut a piece of brass about 1/16" longer than the hole. I then peened one end, turned the piece over, and peened the other side. It looks pretty nice, in my opinion:


I finished the aventail by putting on the mail, which I filched off of my last Viking helm. I inserted a ring into each slit, passing a piece of wire through the brass tube. Then I crimped the ends of the wire, holding everything in place.


All that's left is to add the leather suspension, which may be a little while, as I don't have any leather right now. I plan to sell some Viking helms with rawhide plates soon, and should be buying leather for those. (Incidentally, if you're interested, feel free to email me.)

Until next time,

James

Part 1 | Part 2 | Part 3 | Part 4 | Part 5 | Part 6 | Part 7 | Part 8 | Part 9 | Part 10

March 15, 2008

Viking helm: part VIII

Part 1 | Part 2 | Part 3 | Part 4 | Part 5 | Part 6 | Part 7 | Part 8 | Part 9 | Part 10

Hail!

The main part of the helm is done.


Next I will be adding the aventail hanger. To start, I experimented with widths of metal to see what size would best work. I ended up with a 1" by 17.5" strip of brass, here shown polished:


To bend it into shape, I took a piece of coat hanger, bent it 90 degrees, and hammered the brass around it bit by bit, moving the hanger along as I went. Here it is post bending:


Here's an extreme close-up of the end of the piece, showing the shape of the bend. The flat side will go along the brow band of the helm.


I started cutting the slits in which the rings will go; I've cut eleven of ~70, and filed seven of those. More pictures when I finish that step.

Until then,

James

Part 1 | Part 2 | Part 3 | Part 4 | Part 5 | Part 6 | Part 7 | Part 8 | Part 9 | Part 10

March 12, 2008

Viking helm: part VII

Part 1 | Part 2 | Part 3 | Part 4 | Part 5 | Part 6 | Part 7 | Part 8 | Part 9 | Part 10

Heyla,

It's getting closer to being finished, slowly but surely.

I worked on the ocular over the week, specifically cutting it out, and cutting the eyeholes with a jeweler's saw. Here's the pattern I used:


Today, I worked on shaping the ocular, giving it a ridge along the nose, and bending the tip up (I have no basis of evidence for this, but I like the look of it).


I fitted it to the dome, and marked the parts of the brow band that had to be cut out:


Then, I used a punch to 'nibble' the pieces out, then filed them to a nice finish:


I started riveting the ocular on, but I didn't finish, so I didn't take pictures.

Until next time,

James

Part 1 | Part 2 | Part 3 | Part 4 | Part 5 | Part 6 | Part 7 | Part 8 | Part 9 | Part 10

March 5, 2008

Viking helm: part VI

Part 1 | Part 2 | Part 3 | Part 4 | Part 5 | Part 6 | Part 7 | Part 8 | Part 9 | Part 10

Good morrow,

First off, I would like to show how I make rivets. First, here's a roofing nail unmodified:


Then, I file the flanges down so it will fit flush with the metal surface:


Then, I measure 1/4" from the head and mark it:


I use snips to cut at the mark:


I then file the end to make it flat:


Here it is inserted into the plates:


And this is it from the outside:


I have already posted pictures of the outside peened and finished.

Last Saturday I worked for a while putting together the plates and adding the top bands. I didn't take pictures because I figured it was mid-stage. Anyway, it's now finished. I completed the whole crown; then, I made the top spike. I used a drill to spin a metal rod while I ground it on my bench grinder. The hardest part was riveting the spike on the inside of the dome with a hammer that doesn't fit easily. I managed it, though. Here's a picture:


And a view of the helm as a whole:


And a front view:


And side:


It's looks better in real life. In the above pictures the perspective makes it look funny.

The next step is to make the ocular. I'm not sure yet whether I will use the same pattern as the previous two helms I made or modify it somewhat. We'll see.

Until then,

James

Part 1 | Part 2 | Part 3 | Part 4 | Part 5 | Part 6 | Part 7 | Part 8 | Part 9 | Part 10